The most expensive call a flat owner can get goes like this: “Water is dripping from our ceiling.” In a cast concrete building water from your bathroom finds its way to the neighbour below within hours, and then it is hunted for weeks, with tiles coming off and arguments about who pays. The cause is almost always the same: the bathroom waterproofing was rushed or skipped altogether in the hope that tiles and grout would do the job. Here is how proper bathroom waterproofing works, where it usually fails and what to check before the tiles go on.
In short
- Tiles and grout do not hold water. The waterproofing layer under them does, and it has to be continuous.
- The weak points are known in advance: the floor-to-wall corner, pipe penetrations, the floor drain, the threshold and the shower joints.
- Waterproofing is taken up the walls. In the shower zone it goes higher than the splash line.
- Before tiling, the layer is tested with water. Skip this step and the neighbour below will find the mistake for you.
- A walk-in shower and a floor drain need the most careful work: the fall, the junctions and the sealing decide everything.
Why it leaks even under new tiles
Ceramic tile itself lets almost no water through. Grout does, especially cement grout, and within a year or two it develops hairline cracks. Tile adhesive is no barrier either. Water that gets behind the tiles runs down the screed to the lowest point, which is usually a corner by the wall or the riser outlet. There it finds a gap in the floor slab and after a while shows up on the neighbours’ ceiling, sometimes a couple of metres away from your bathroom.
New buildings in Batumi add a local twist. Many flats are bought in black frame condition and renovated quickly, in time for the season, and the bathroom is often last in line. It gets put together in a few days, and waterproofing becomes the easiest stage to save time on. Nobody sees it, and for a couple of years it may give no sign of itself.
Where waterproofing is needed
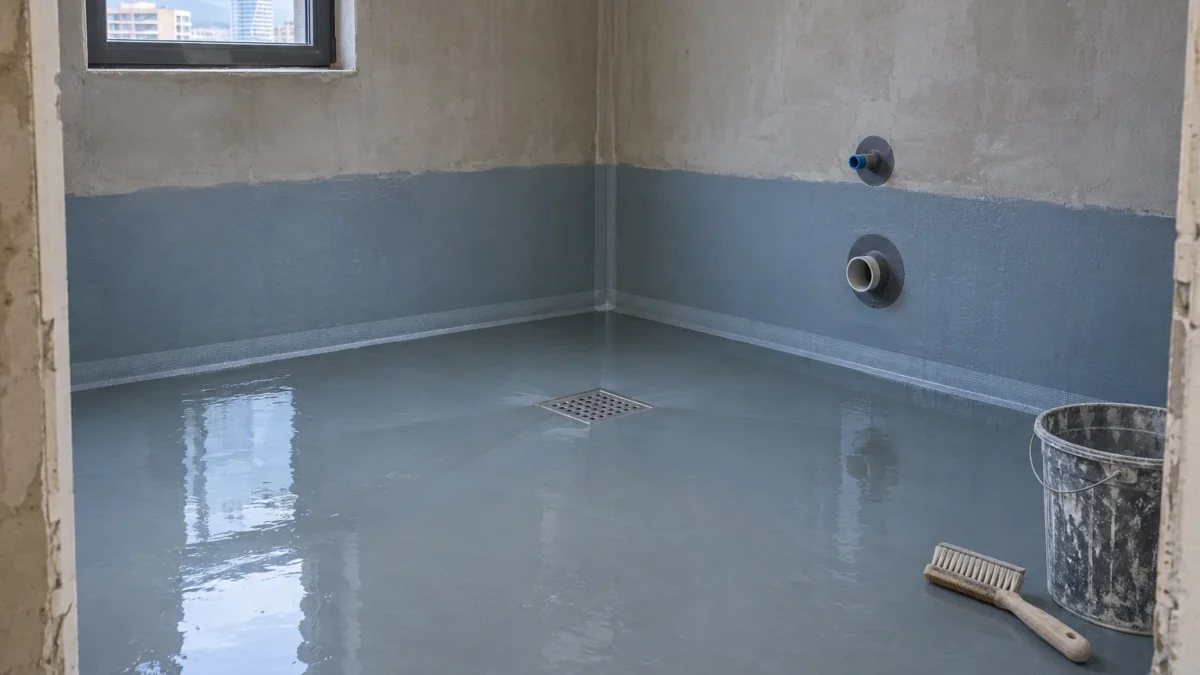
In a bathroom or a combined bathroom and toilet it covers the whole floor. On the walls the layer is taken up in a band of 15 to 20 centimetres around the perimeter so that water from the floor does not escape into the corner. In the shower zone and above the bath the walls are covered higher, up to where splashes actually reach. For an open shower that usually means almost the full height of the wall.
It is worth thinking separately about the kitchen under the sink and the spot under the washing machine if it is not in the bathroom. Full waterproofing is rarely needed there, but a tray under the machine or a leak sensor costs very little next to repairing a neighbour’s ceiling. If the flat is let nightly, guests run water more often and are not known for being careful, so it makes sense to build in a bigger safety margin in the bathroom than usual.
Materials
Flats most often use liquid-applied waterproofing. This is a mix or paste applied with a brush, roller or trowel in two coats at right angles to each other. The result is a seamless membrane that follows every irregularity. Flexible cement-based products work well with tile adhesive and suit both floors and walls. Polymer pastes are easier to work with and dry faster, but the manufacturer must allow tiling directly onto them.
Bitumen-based roll waterproofing is less common in flats: it is thicker, harder to take around pipes, and tile adhesive will not stick to it on its own. There are also sheet membranes bonded to walls and floor with a special adhesive. They cost more but give an even layer thickness and work well in walk-in showers.
Whatever the material, it is not mixed by eye from one bucket. Coverage, number of coats and drying time are set by the manufacturer, and they decide whether the membrane will hold water. A thin layer applied in one pass usually leaks.
Joints where it all fails
Waterproofing almost never leaks in the middle of the floor. It fails where different surfaces meet or pipes pass through. That is why a good crew starts with the joints and covers the large areas afterwards.
- The floor-to-wall corner. Flexible reinforcing tape is bedded in here, and internal and external corners get ready-made corner pieces. Without tape the layer cracks at the slightest movement of the screed.
- Pipe penetrations. Each pipe gets a sealing collar bonded into the layer. Otherwise water will run along the pipe as if along a wick.
- The floor drain and outlet. The drain body must have a flange for waterproofing, and the layer is taken right onto it. Smearing around it is not enough.
- The bathroom threshold. If the bathroom floor is level with the hallway, water from an overflow runs under the laminate. A small threshold or a level difference with a fall into the bathroom solves this.
- Where the bath or shower tray meets the wall. Waterproofing first, then tiles, and the gap between bath and wall is closed with sanitary sealant. Sealant alone without a layer under the tiles is not enough.
Walk-in shower and floor drain
A shower flush with the floor looks modern and is convenient, especially in flats that are let, where guests do not have to step over a rim. But it is the most demanding detail in the whole renovation. The floor in the shower zone is laid with a fall towards the drain, usually around one to two per cent, so that water runs off and does not stand in a puddle. The fall goes into the screed: trying to build it up with tile adhesive almost never works.
The drain is chosen by the height of the floor build-up: flats with a thin screed need low-profile models, otherwise the whole floor has to be raised. Waterproofing in a walk-in shower is usually done with a margin: two full coats, reinforcement at every junction and walls covered to the full height of the splash zone. The glass screen is placed so that water from the floor runs to the drain and does not reach the door.
If you want a walk-in shower in a flat where the slab is already in place and the screed is thin, the design solves it. Sometimes a linear drain along the wall is enough, sometimes the bathroom floor has to be raised a little. We work out these details at the design project stage so the heights are not discovered on site.
The flood test
Once the waterproofing has dried, the bathroom floor is flooded a couple of centimetres deep, the threshold is temporarily dammed and it is left for a day, better two. Then the ceiling below and the water level are checked. If the neighbours are away or live abroad, it is enough to watch the level and the joints: the water should not go anywhere.
This step costs one day of waiting and is the one most often skipped. The usual argument: “we always do it this way and it has never leaked.” But it is the test that shows whether the collars on the pipes and the corner at the threshold are bonded properly. Finding a leak now means touching up the layer in one place. Finding it a year later means taking off half the tiles.
If you cannot be on site, ask for a video before, during and after the flood test. Or arrange for a site supervision engineer to sign off this stage: he will photograph the joints before the tiles cover them.
Table: stages and checks
| Stage | What is done | What to check |
|---|---|---|
| Substrate | The screed is levelled, dried, dusted and primed | No cracks or loose spots, fall to the drain built in |
| Joints | Tape in corners, collars on pipes, drain flange bonded in | Every pipe and every corner covered, tape without creases |
| Coats | Two coats at right angles with drying in between | Continuous cover with no gaps, taken up the walls |
| Flood test | Floor flooded for a day or more | The level does not drop, dry below |
| Tiles | Adhesive compatible with the waterproofing | Layer not damaged during tiling, joints filled |
| Finish | Sanitary sealant at junctions | Bath, tray and screens sealed |
Common mistakes
- Thinking moisture-resistant plasterboard replaces waterproofing. It copes with humid air better than ordinary board but still soaks up water.
- Covering the floor without taking the layer up the walls. Water escapes into the corner and the whole floor is wasted effort.
- Smearing around pipes without collars. A couple of years later a stain appears at the neighbours’ in that very spot.
- Tiling over a layer that has not dried, in a rush for the season. The membrane tears under the adhesive.
- Drilling the shower walls after the renovation without remembering there is a layer under the tiles. Every wall plug for a shelf should go in with sealant.
- Making a walk-in shower without a fall in the screed. Water stands by the glass and seeps into the joints.
Questions and answers
Can waterproofing be done without replacing the tiles?
Not properly. From the surface you can renew the grout with epoxy and seal the junctions, which lowers the risk, but it does not replace the layer under the tiles. If it is already leaking, the bathroom almost always has to be opened up.
How long does waterproofing dry before tiling?
It depends on the material, temperature and humidity: from a few hours between coats to a day or more before tiling. The manufacturer gives the exact time. In damp Batumi weather, allow extra.
Is waterproofing needed with an ordinary bath?
Yes. Water gets onto the floor with every bath, with an overflow and when a trap breaks. A bath reduces splashing, but leaks under it are found later than in a shower.
What if the neighbour upstairs has already flooded your bathroom?
Photograph the traces with the date and tell the neighbour and the management company or homeowners’ association. Let the ceiling and walls dry and check whether the electrics were affected. After that a report of the flooding is usually drawn up, which is useful in any dispute over compensation.
If you are planning a bathroom renovation, start with the design and the estimate: in a turnkey bathroom renovation waterproofing, the drain and the flood test are part of the scope from the start. You can also order plumbing work and tiling separately. How not to get the budget for the whole renovation wrong we covered in the article on what makes up the cost of a renovation.